Below are 3 of the most common carving blocks in
letterboxing. So I am going to focus on these. All can be purchased at www.stampeaz.com
or you can get the Speedball at your local art/craft store.
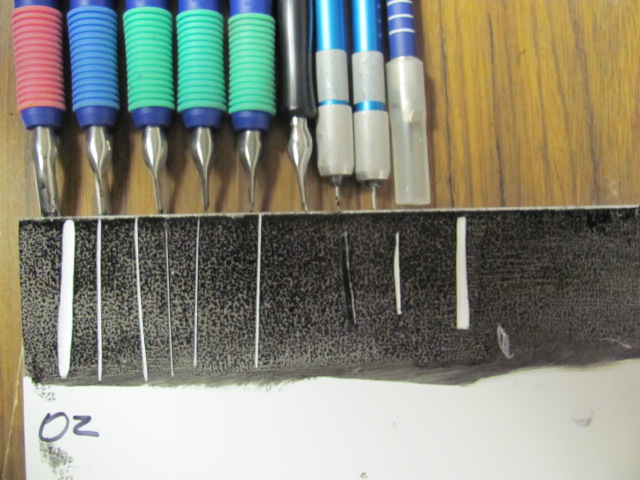
Pictured below are the OZ, NZ, and the Speedball blocks with
black in on the end to show contrast.
These are fresh blocks never carved on before. I did use some
green ink on the NZ to start to show contrast, but immediately changed my mind.
There is some ink that show on the block.

After inking up the blocks I let them sit for 20 min. All of them were still tacky at this point.
The tools I used were sharpened before each cut
and laid down next to the block. Due to size restrictions
the tools do not line up exactly, but
you count to figure out which tool make what cut.
Starting from left to right:
- Staedtler #3 Gouge
- Staedtler #2 Gouge
- Staedtler #1V Gouge
- Staedtler #1 V Gouge miniaturized
- Staedtler #1 V Gouge reversed
- Speedball pen holder with a
Lino Cutter #1 that was heated and then pinched with pliers to make
narrower
- Wire knife in a pin vice
- 16 gauge hypodermic needle
removed from its base and placed in a pin vice and an exacto knife with a
new blade.
If you do not have the Staedtler
gouges set - speedball is also a good product. I have a set of those here too.
I have separate handles for each nib (the part you cut with). I glue the nib
into the holder. I have done that with the #1 speedball gouge that I heated and
pinched above. It makes it much easier to sharpen when it is permanently set.
The trick is to inspect and use your nib, making sure that it cuts correctly
before setting it in. Super glue works just fine.
OZ - is the newest material available. I used light pressure
on the tools to make the cuts. All tools cut well. The important piece of
information is to make sure that you make you cuts line up correctly or you
will have elastic pull at corners. Easy to fix with a quick knife snip.

NZ - is firmer than OZ. When cutting this material I used
more pressure on the tools. This material also works well, but it dulls tools
faster. As long as you keep your tools sharpened there won't be a problem. This
material is harder to use knives and needles on due to the material pushing in
when you go to cut it. It is absolutely doable, but the carver needs to beware
of smashing the material then cutting could make the image distort, especially
with thin lines next to thin lines.

Speedball - this is a very soft material and easy to cut on.
(there is some bad stuff out there and it can crumble so make sure you check it
before you buy - bend it) This material has been around for a long time and is
a favorite of many. Due to the easy cut surface of this material make sure you
are more careful than usual so you don't get cut.

Above - here are the slabs laid out to display how they look next to each other. All slabs were sanded lightly and wiped for dust. The OZ has bubbles of ink on it where the others do not. I am not exactly sure the reason for this, but I might have to do an acetone wipe on it so that the ink sits well.
Why prep the surface? The more the image is inked up the better the printed image will be. Why, not hurry the process when it takes just a moment?
I have had some technical difficulties. So I changed
cameras. Hopefully that will help give a clearer picture. To start off with -
carving is messy, inking is messy, and you will have inky fingers when you are
done. It is well worth it and lots of fun.
As I am trying to figure out the pictures Timothy in playing with paint - think he is trying to tell me something?

No comments:
Post a Comment